Asset Configuration
The Stairwell forwarder is configured out of the box to be as lightweight as possible while still accomplishing the goals of providing unparalleled visibility into your environment. In some rare cases, it is desirable to change request rates to better match your environment. This feature is available in the following forwarder versions.
| OS | Version Supported |
|---|---|
| Windows | v1.6.2 or later |
| Linux | v2.4.0 or later |
| Mac | v1.6.2 or later |
There are several major configurations you can change, which we've outlined below.
Repeat Sightings
The Repeat Sightings setting defines how long to suppress duplicate sightings of the same file (same hash, path, and asset). For example, if a file is seen at a specific path on an asset at 1 PM and the setting is 6 hours, identical sightings will be ignored until 7 PM.
New sightings are always recorded if the file’s location, contents, or asset changes.
This setting only affects the "last seen" time in the Stairwell UI - it does not impact file storage or analysis.
Defaults and Recommendations:
- Range: 1–24 hours (default: 6 hours)
- Lower values improve timestamp accuracy but increase forwarder load.
- Higher values reduce load but may make time-based analysis less precise.
A 6-hour setting balances accuracy and performance for most environments.
Batch Upload Rate Limit
Batch Upload Rate Limit controls how long sightings are batched before being sent. For example, with a 20-second setting, sightings within that window are sent together as one request.
Defaults and Recommendations:
- Range: 1 second to 1 minute (default: 20 seconds)
- Lower values increase request frequency and CPU usage.
- Higher values reduce load but slightly increase risk of data loss
A 20-second setting balances performance and reliability for most environments.
Installation Defaults
Windows Forwarder 1.7.4 and above support the ability to start a forwarder in sleep mode upon registration.

A forwarder that starts in sleep mode will not run its initial backscan until it is woken up.
Scan Mode
Windows Forwarder 1.7.2 and above support how forwarders will run scans on assets. It currently has two modes:
- Default (Realtime scanning) By default, forwarders will be configured to not run any backscans (other than the initial backscan that takes place upon installation). In this setting, Stairwell will only be configured to run real time scanning.
- Only backscan mode Configures the forwarder to only run a daily backscan within a predetermined timeframe, with the absence of real time scanning.
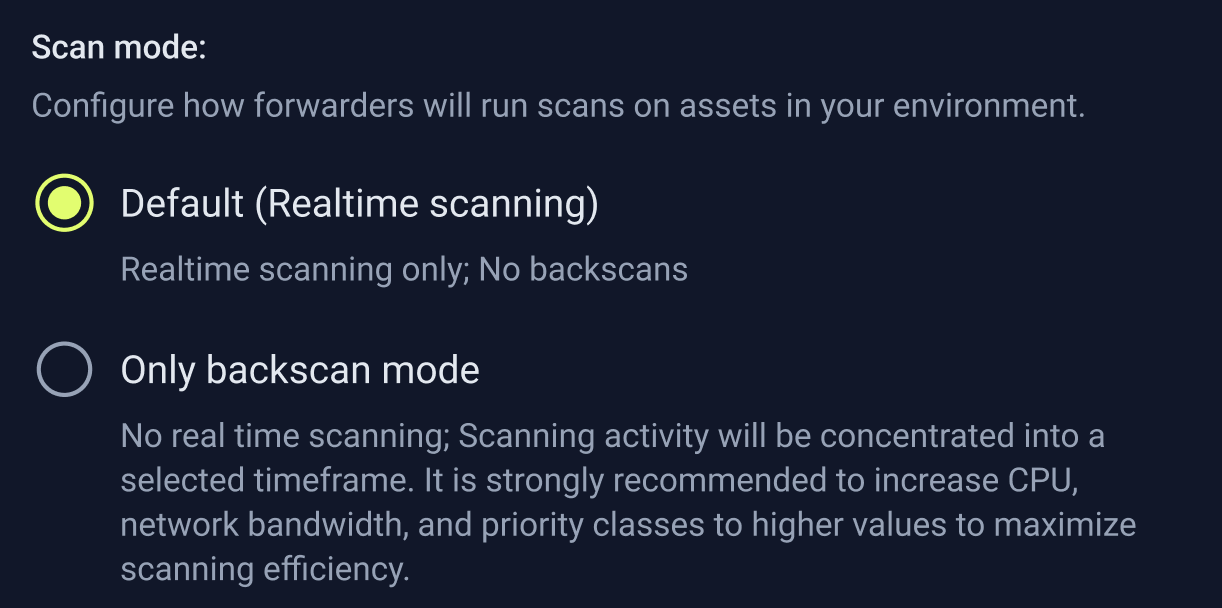
Enabling "Only backscan mode"
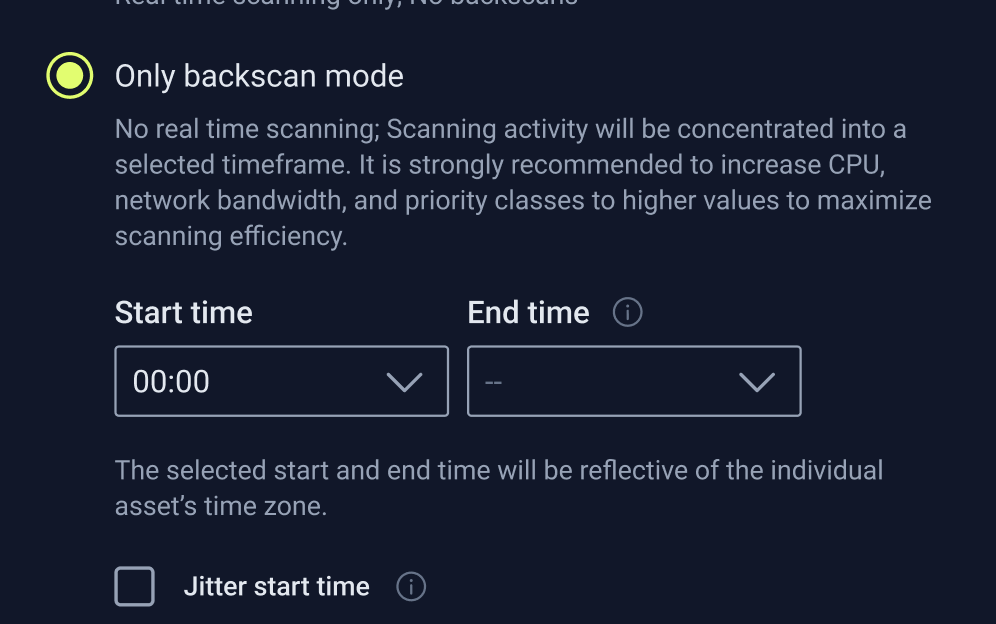
“Only backscan mode” can be enabled by clicking and selecting the configuration under the “Scan modes” section within “Forwarder settings”.
- Once the configuration has been selected, fields for “Start time” and “End time” will be displayed under the selected configuration.
- By default, the selected “Start time” will be “00:00” (meaning backscans will start daily at midnight).
- By default, the “End time” field will be empty (meaning the backscans will run until completion). Selecting an
- “End time” will mean that the daily backscans must end by the selected “End time”. All selectable start and end times are in 30 minute increments.
Jitter start time

Allows for backscan start times to be varied across individual assets under the specific forwarder settings in order to reduce the potential burst in scanning traffic. When “Jitter start time” is selected, backscan start times will be varied for individual assets up to 30 minutes earlier or later than the selected start time.
What scan mode is an asset configured for?
An asset’s scan mode can be seen on the _Assets page table under the “Scan mode” column. The scan mode for an asset will show as either “Real time scanning” or “Backscan only”.
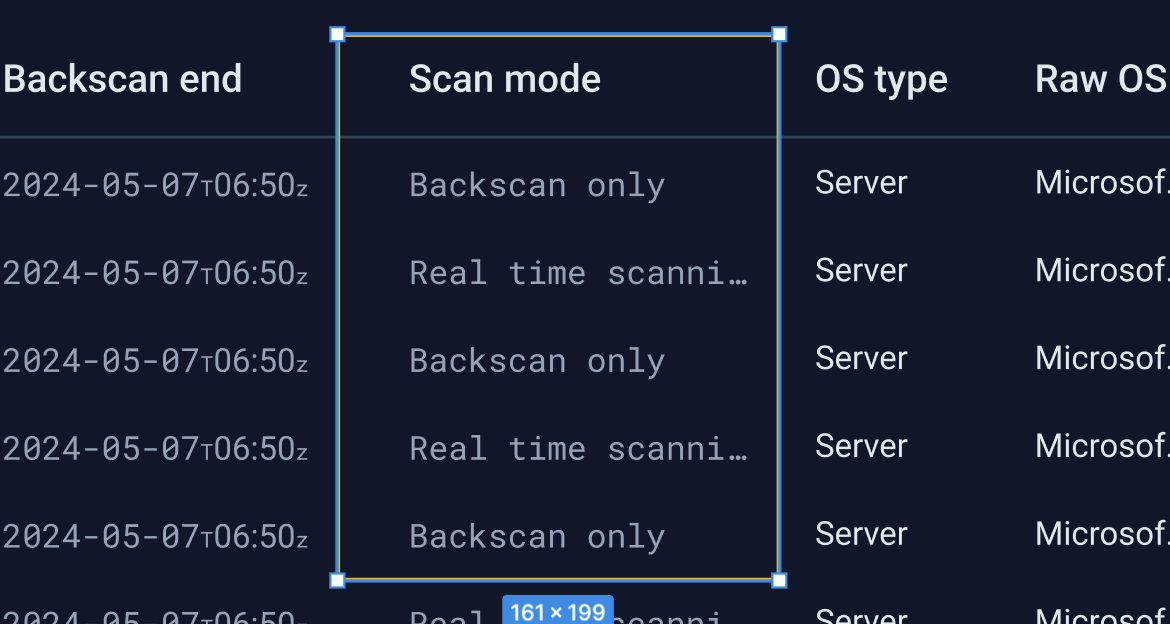
One time backscans
One time backscans can be run on individual or multiple assets regardless of which scan mode they are configured for. To run a one time backscan:
- Select all the assets you wish to run the backscan on
- Right click on the asset on the “Assets” page to open the menu.
- Select “Run backscan” and the one time backscan on the asset will begin.
- The one time backscan will run until completion regardless of the asset’s selected scan mode settings.
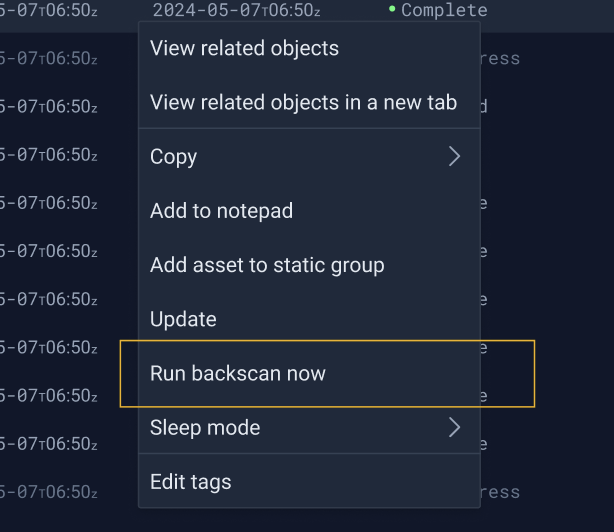
One time backscans on multiple assets at once
One time backscans can also be run on multiple assets at once. To run a one time backscan on multiple assets, bulk select the desired assets from the “Assets” page table view and then right click on any of the selected assets to open the context menu. Select “Run backscan” from the context menu to run the one time backscan on all selected assets.
One time backscans on an asset group
Additionally, one time backscans can also be run on one or more asset groups.
- Navigate to the “Groups” tab on the “Assets” page to view the list of asset groups.
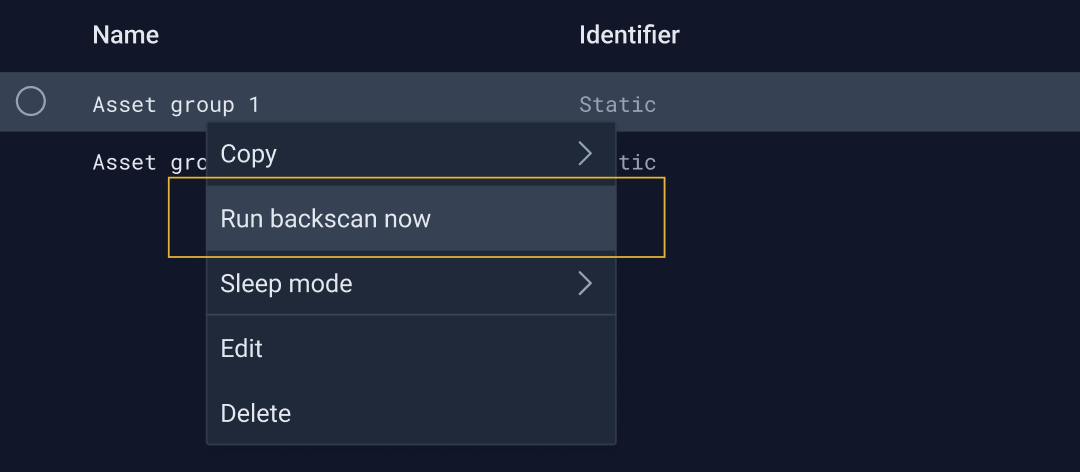
- Right click on an asset group to open the context menu.
- Select “Run backscan” from the context menu to run the one time backscan on the selected asset group.
- After clicking on “Run backscan”, the asset’s backscan status will update to read “In progress”.
Backscan status
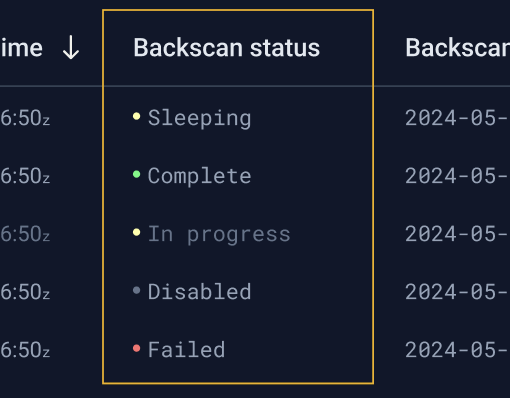
An asset’s backscan status can be seen on the “Assets” page table under the “Backscan status” column. Backscan statuses include:
- Complete: backscan successfully completed
- Failed: backscan failed
- In progress: backscan was started and is in progress
- Backscans may take up to 10 minutes from the selected start time to actually begin.
- Disabled: backscans for the asset has been disabled
- Sleeping: backscan was started but did not finish in the selected timeframe or asset is in sleep mode.
Notes about backscan mode
- While a backscan is in progress, all resource usage limitations set within the asset’s policy settings will apply. It is strongly recommended that an asset’s policy settings for resource usage limitations all be set to high values in order to ensure that the backscan completes successfully.
- If an asset is offline when a backscan is scheduled to begin, the backscan will be skipped.
- An asset can be assigned to multiple asset groups with different/conflicting policy settings. In this scenario, the asset in question will take on the most restrictive settings between the two policies.
- This applies to an asset’s scan mode as well (if an asset has been assigned to multiple groups with differing scan mode settings, the asset in question will take on the setting for “Only backscan mode”.)
Advanced Settings
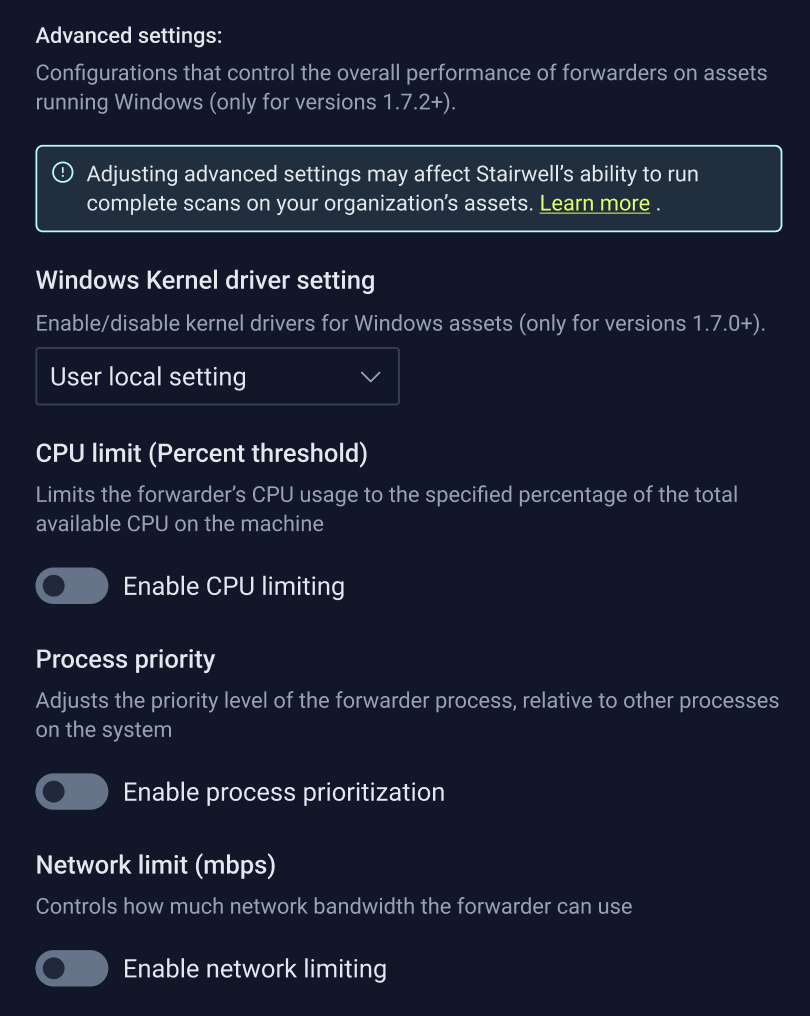
Configurations that control the overall performance of forwarders on assets running Windows.
Windows Kerneless Mode
Windows Forwarder 1.6.6 and above supports disabling the forwarder driver and running without any kernel presence.
This mode results in limited visibility, but may be required in certain environments. When the driver is disabled, the forwarder will continue to sight process execution and DLL loads. However, file modifications are no longer visible.
The driver status can be changed per-policy, via the Windows kernel driver setting. For auditing purposes, forwarders report their driver status (enabled or disabled), and this is visible on a forwarder’s asset page.
Key Considerations
- Visibility is reduced in kerneless mode.
- When the driver is disabled, the forwarder will only see process executions.
- For example, if a user launches notepad.exe, the forwarder will see notepad.exe and all associated .dll files as they are loaded.
- File-related activity is no longer directly visible.
- The forwarder will no longer see file data modifications, new files, file deletes, or file renames.
- This will likely lead to missed sightings in your environment. For example, if a batch file is created, executed, and deleted in a short amount of time, the forwarder will no longer sight the file.
- Mitigation with Daily Backscan
- To partially mitigate missed sightings in kerneless mode, Stairwell recommends that you enable a daily backscan. This way, any new or modified persistent files will be sighted.
Changing the Driver Status from the Server
The forwarder driver status can be set from the server by modifying the Windows kernel driver policy setting. Keep in mind that a forwarder can be part of multiple policies, and the forwarder driver will be disabled if any of the policies are set to Do not use kernel driver
There are three choices for the Windows kernel driver setting:
-
Use local setting_(default):
- In this case, the policy contains no information about the driver status, allowing the forwarder to decide based on its local configuration. By default, the local setting will be 'Use kernel driver'. You can change this by installing with the
DRIVEROVERDES=1flag, as explained later in this document.
- In this case, the policy contains no information about the driver status, allowing the forwarder to decide based on its local configuration. By default, the local setting will be 'Use kernel driver'. You can change this by installing with the
-
Use kernel driver:
- This forces the forwarder to use the kernel driver, overriding and overwriting any local configuration.
-
Do not use kernel driver:
- This forces the forwarder to disable the kernel driver, overriding and overwriting any local configuration.
Detailed Steps
To change the Windows kernel driver setting:
- Choose the policy to modify on the Assets --> Policies.
- Selected your desired setting for Windows kernel driver.
- Click the Save button in the top-right corner.
- If you selected Do not use kernel driver , acknowledge the risks associated with disabling the forwarder driver by clicking the Confirm Changes button.
Installing the Windows Forwarder with the Driver Disabled
By default, the forwarder installs with the driver enabled. To install with the driver disabled , pass the DRIVEROVERRIDES=1 command-line parameter to the installer. For example:
.\\StairwellForwarderBundle.exe TOKEN="TOKENHERE" ENVIRONMENT_ID="ENVIRONMENTIDHERE" DRIVEROVERRIDES=1 /quiet /norestart /log C:\\stairwell.logNote: This setting will be overwritten if the policy received from the server specifies a conflicting value for the driver status. To prevent this, ensure that the Windows kernel driver setting is set to either:
- Use local setting (this is the default value) or
- Do not use kernel driver
CPU limit
Windows Forwarder 1.7.2 and above support limiting the forwarder’s CPU usage to a specified percentage of the total available CPU on a specific machine.
Enabling CPU limiting
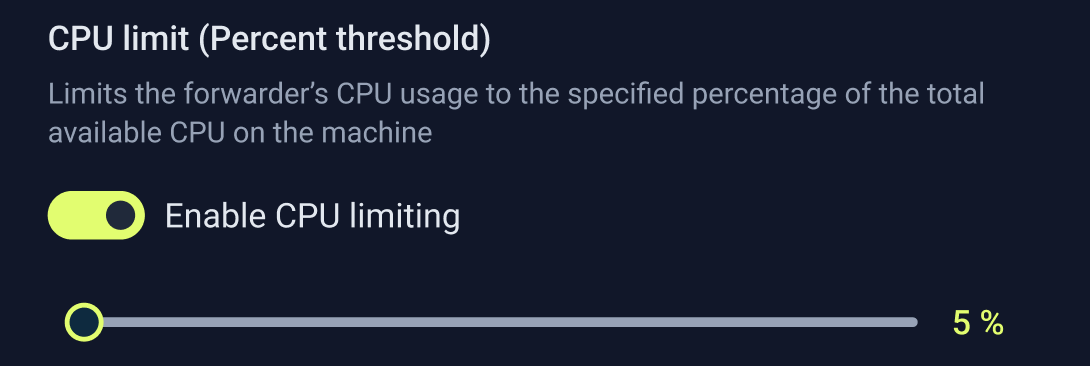
The CPU limit setting can be found under “Advanced settings” within the “Forwarder settings” section for policies.
- By default, CPU limiting is toggled off.
- Clicking on the toggle button will enable CPU limiting and show the CPU limit percentage slider.
- When “CPU limit” is enabled, the default value will be “5%” (this is the lowest percentage CPU limiting can be set to. CPU limit must be a minimum of 5%).
- The limit can be adjusted in increments of 5% and to a maximum of “100%”.
Process priority
Windows Forwarder 1.7.2 and above support controlling the priority level of forwarder processes relative to other processes on the asset’s system. The forwarder processes priority can be set to either “Normal” or “Low”.
Enabling process prioritization
The “Process priority” setting can be found under “Advanced settings” within the “Forwarder settings” section for a policy.
- By default, “Process priority” is toggled off.
- Clicking on the toggle button will enable process prioritization and reveal two options to select from: “Normal” or “Low”.
- When enabled, the “Normal” option will be selected by default.

Network limit
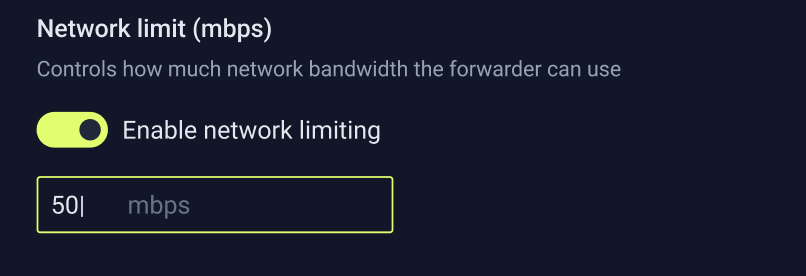
Windows Forwarder 1.7.2 and above support how much network bandwidth the forwarder can use for an asset. The network limit can be set by inputting a mbps limit.
Enabling network limiting
The “Network limit" setting can be found under “Advanced settings” within the “Forwarder settings” section for policies.
- By default, “network limit” is toggled off.
- Clicking on the toggle button will enable network limiting and reveal an input field for mbps. When enabled, the default network limit will be set to “50 mbps”.
- The minimum value that can be inputted for network limiting is “1 mbps”. There is no maximum value.
Notes for Advanced Settings
Adjustments to the advanced settings may affect the forwarders ability to run complete scans on assets.
- If a policy is set to “Only backscan mode”, It is strongly recommended to increase CPU, network bandwidth, and priority classes to higher values to maximize scanning efficiency.
- If a policy is set to “Only backscan mode” and adjustments have been made to advanced forwarder settings, ensure that the backscan time frame is large enough for scans to be completed.
- An asset can be assigned to multiple asset groups with different/conflicting policy settings. In this scenario, the asset in question will take on the most restrictive settings between the two policies.
Updated 5 months ago
